How to Build a Fraud Model with a Feature Store


Many companies with platforms that involve financial transactions are looking to bring them in-house to some degree as they can have more control over the user experience and usually save money on transaction fees over outsourced solutions. While the advantages are obvious, a key risk is dealing with payments fraud.
At a minimum, most payment partners will set a threshold for fraud processed through their platform, such as 8 basis points (0.08%) of gross payment volume. Larger companies may look to become a payment facilitator (payfac) which offers more control and sidesteps more of the typical assessed transaction fee, but means that these companies are liable for all fraudulent activity they process. Needless to say, identifying and preventing fraud is critical to the financial health of any company processing payments.
Fortunately, machine learning models can be very effective in preventing fraud and can be retrained to identify new fraudulent behavior as fraudsters adapt. For such a model to work as part of a payments flow, you’ll need to run this model in production and quickly make fraud predictions as your users might be waiting for your model’s fraud prediction before continuing on with the app flow.
Putting models into production is hard. One of the most challenging parts is figuring out how to feed a production model the right data to make a prediction. It has to be the same data that you use to train the model, and in the case of our fraud model, it has to be served up quickly to make the prediction. A feature store like Tecton can streamline the work needed to put a fraud model into production. Tecton enables you to ingest data from a variety of sources, transform and aggregate it using SQL and Python, and serve the data to your model quickly.
Additionally, real-time fraud problems typically require very fresh features, since fraud attacks can be automated, leading to a large amount of fraud in a short period of time before batch-based fraud models can detect and shut down fraudsters. Tecton is rolling out the ability to perform aggregations on your streaming sources so you can create complex features using the freshest information possible.
Here we’ll show an example of a transaction fraud model from training to production inference leveraging Tecton. We’ve also attached full source code here, so you can explore the Tecton feature store code and the three Jupyter notebooks we discuss in this article.
Overview
At a high level, machine learning applications typically have training and production inference stages. In the training stage for our transaction fraud model, we need to pass in a number of examples of past transactions with a label of whether that transaction was fraudulent or good.
In our case, we’re passed context about the transaction–amount, payment method, etc. We want to layer in information about the user who is initiating the transaction, like the user’s credit score, the user’s age on the platform, and also aggregations like number of transactions and the total amount of those transactions made in a variety of time windows.
A typical model training and deployment use case with Tecton might follow the below path:
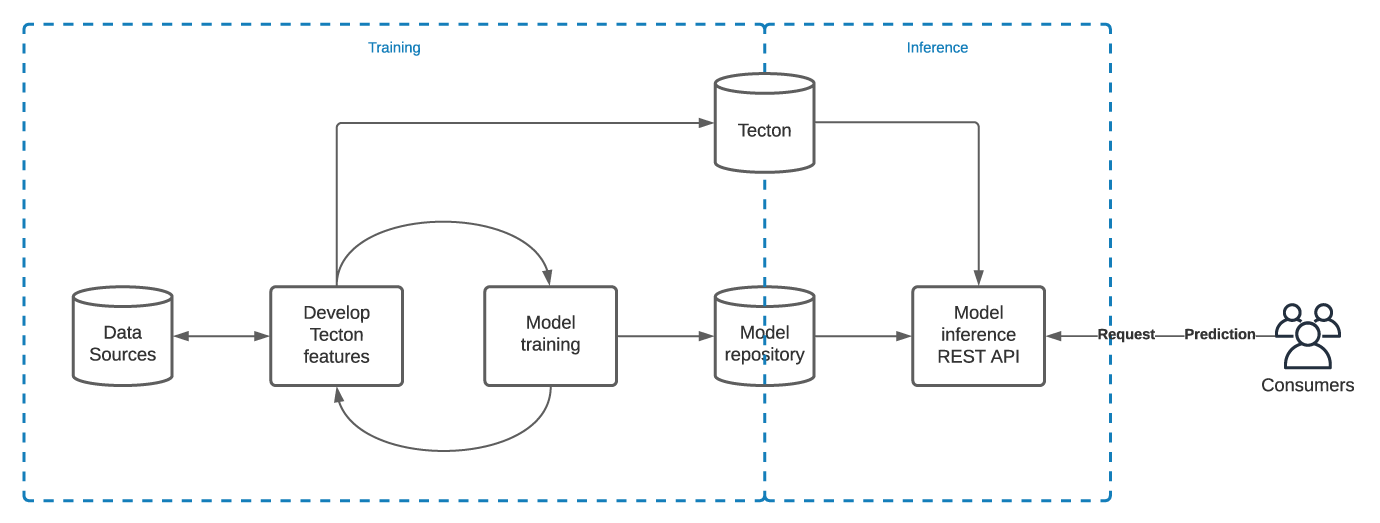
- Develop Tecton features from your data sources: You’ll either need to develop new Tecton features from your data sources, and/or you can reuse existing ones once they’re in Tecton.
- Train model: Once you have your features developed, you’ll want to extract a training dataframe by submitting a list of keys (like a user id) and timestamps you want to have Tecton enrich with your features. You’ll iterate between developing and tweaking your features and training the model until you get it where you want it. At the end of this process, you’ll probably want to upload your model artifacts to some model repository (like mlflow) and save a copy of the training data. Tecton can save your training dataset for you.
- Launch inference production service: Now that you have a trained model and you’ve set up Tecton for online serving, you’re ready to go!
1. Developing Tecton Features
Tecton features are written in PySpark so you can use all of your Spark and Python skills and pick the language that best expresses what you’re trying to do. You can think of most Tecton features as consisting of a query to a data source—data warehouse, CSV file, Kafka stream, etc.—along with optional transformations or aggregations. As mentioned, we provide the full source code here.
- Sources: In our example, we source all of our features from three AWS Glue tables, which are managed Hive tables under the hood.
- Transformations: Our next step is to query a data source, and transform or aggregate data, and Tecton lets us do this in powerful ways. Here’s a transformation, which is just a SQL query in this case.
@sql_transformation(inputs=data_sources.credit_scores_batch)
def credit_score_transformer(credit_scores_batch):
    return f"""
    SELECT
        user_id,
        credit_score,
        date as timestamp
    FROM
        {credit_scores_batch}
"""- Feature Packages: When you’ve got your transformations just right, you have a few options to tell Tecton how much historical data to save and whether to materialize it for offline or online access (you can always wait for Tecton to execute the SQL query in situ if you’re in a batch training scenario). You can also chain transformers together, and share common transformations across features.
The entities parameter tells Tecton that the user_id in the transformation’s SQL query above is the join key. That is, later on, we’ll want Tecton to return us the credit score for a given user id. You can get a full listing of our granular materialization settings possibilities here.
users_credit_score = TemporalFeaturePackage(
    name="users_credit_score",
    description="A users credit score",
    transformation=credit_score_transformer,
    entities=[e.user],
    materialization=MaterializationConfig(
        online_enabled=True,
        offline_enabled=True,
        feature_start_time=datetime(2020, 12, 1),
        schedule_interval='7days',
        serving_ttl='21days',
    ),
)- Feature Services: You’ll want multiple feature packages (which may each have one or more features) to serve to your model. This is why Tecton has the notion of a feature service. Generally, each model will have its own feature service. In this case, our fraud prediction service serving our fraud model has four feature packages, but the transaction_aggregates package itself includes multiple features.
fraud_prediction_service = FeatureService(
    name='fraud_prediction_service',
    description='A FeatureService used for fraud detection.',
    online_serving_enabled=True,
    features=[
        transaction_aggregates,
        users_credit_score,
        days_since_last_transaction,
        user_age_days
    ]
)2. Model Training
Extract training dataframe from Tecton
Now that we’ve coded up our Tecton features, we can extract them from Tecton in order to train our model. To do this, you pass a request dataframe to Tecton with your data points and training labels and you enrich it with the feature data you have stored in Tecton, and Tecton passes back the dataframe enriched with the features we ve coded in Step 1. Specifically, here are the steps:
- Generate a prediction context (request) dataframe: We generate the request (or prediction context) dataframe by querying the transactions table, which is also the source for our transaction features. This request dataframe can contain additional columns too, and Tecton will return those columns untouched.
- Write the training dataframe (optional): It’s a good idea to save your training dataframe so you have a record of how your model was trained. Also, while you need to extract the training dataframe from Tecton in a Spark environment, if you write the dataframe to a file store or database, you load this dataframe and do your model training in a Python-only environment like Jupyter notebooks on your local machine or in SageMaker.
Train your model
Now that we’ve covered our Tecton features, we turn to the Jupyter notebook to show how Tecton can help you feed data into your model during the training stage.
In this fraud notebook, we’re doing something a little clever. We’ve coded up a number of features about a user id in Tecton—remember, our join key is the user id. However, we want to predict whether a transaction is fraudulent.
So we’re going to train a model that layers in information about the transaction along with information about the user who initiated the transaction at the time of the transaction. This is important! You’ll want to know, for example, how many transactions the user had made in the 24 hours prior to that transaction and how it’s associated with the label, in our case isfraud.
Woah.. this sounds hard 😬. Au contraire! You’ll just need to pass a request dataframe containing both the user id and the timestamp, and then Tecton looks up the features’ values at that timestamp and returns it to you, joined with your request dataframe.
- Start mlflow model logging (optional): We’re using mlflow to log our training run and save the model. It doesn’t have to be mlflow, but picking a model CI/CD pipeline will pay off at inference time! Managed mlflow is bundled with Databricks accounts.
- Train and score the model: Our model isn’t going to win any awards in Kaggle, and there are lots of tweaks you can make before putting this into production.
3. Model Inference
Now for the moment of truth! Normally, this would be run in a separate production Python environment like SageMaker on AWS for example, and it would be a pure Python file as opposed to a notebook. Here are the steps in this notebook
- Load your model: In our case, we load it from mlflow.
- Get the Tecton feature vector: The incoming request would normally include the user id, so we pass it to Tecton to get the features on this user.
- Layer in additional transaction info and reorder the columns so it matches our model: Remember, we’re predicting whether a transaction (not a user) is fraudulent, so we’re adding the additional request columns and reordering them so they fit into our model.
Make the prediction and return: The rest is easy – model.predict() and return the result.
Conclusions
We just covered a soup-to-nuts implementation of a fraud model and shown how you can implement something similar in your organization. We haven’t included streaming features in this example for brevity, but that would be a natural next step. We’d love to hear how you’ve designed your fraud model and any lessons you’ve learned in the comments section below. Reach out to us if you have any questions and happy modeling!
Code source: here